Help! Why aren’t my pictures sharper?
One of the frequent complaints that I’ve heard from my students, whether they’re just starting out in photography or have been shooting for years, is that they just can’t seem to get their photos to be as sharp as they’d like. And they’ve asked me to help “diagnose” the issue and figure out whether the culprit is their lens, their settings, their technique, or their camera. If sharpness is something you’ve struggled with, maybe it’s time to dig deeper into the problem and see where we should actually be pointing our fingers.
In a nutshell, there are four main things you can legitimately blame when your images aren’t as sharp as you’d like them to be:
Your lens just isn’t sharp enough
You aren’t establishing focus and depth of field properly
Your shutter speed is too slow for the circumstances
You’ve cropped too far into the picture
This is never to blame: “Your camera just isn’t good enough.”
Let’s put this one to rest right away, and never look back at it. Every digital camera produced in the last 15 years, at least, has enough resolution to produce a sharp image at normal screen sizes and print sizes.So let’s look at the legitimate reasons why some of your images might not be sharp.
Your lens just isn’t sharp enough
This one is mostly a copout. While not as ridiculous as the idea that your camera isn’t good enough, the idea that your lens isn’t good enough to produce a sufficiently sharp picture at normal viewing sizes is generally propagated by lens manufacturers to get you to buy their most recent release. You may have noticed that “Version 1” of your favorite lens is the most amazing thing since sliced bread, UNTIL “Version 2” is released two years later. Then, all of a sudden Version 1 is fraught with all kinds of engineering inadequacies like barrel distortion, coma, chromatic aberrations, and vignetting, all of which have been completely eliminated in the newer version. And you can guess what happens when Version 3 gets released.
To be clear, there ARE differences in overall sharpness between lenses, and between different versions of the same lens - but almost all of these are only discernible when you zoom in to your picture at 100% magnification with photo editing software - what we like to call “pixel peeping.” When printed or viewed on a screen at normal magnification, however, these subtle variations would never be the difference between a picture that looks “sharp” versus “not sharp enough”.
Here’s another wrinkle: For any given lens, the center of the image circle will always be the sharpest, and the sharpness will decrease as you get closer to the edges by varying amounts, depending on the lens. Again, this is an issue that will almost never result in an image “not being sharp enough.”
There’s one more lens sharpness issue that affects zoom lenses: sometimes a long zoom lens is less sharp at the longest extension (highest focal length number) than it is throughout the rest of its zoom range. While this is a real problem, I’m again going to argue that in most cases, this lack of sharpness is not going to be noticeably detrimental to your photos. And if it is, you can usually remedy the situation by pulling back on the zoom a little and shooting at slightly less than the longest focal length (for example, shooting at 350mm on a 100-400mm zoom). More commonly, however, lack of sharpness at the long end of a zoom lens is due to bad technique. Most people don’t realize how fast their shutter speed needs to be to actually produce a sharp shot with a long lens. Much more on this later.
Here’s my bottom line when it comes to lens sharpness: The lens you have is more than sharp enough. If you spend a thousand dollars more, you will indeed get a sharper lens, but you will only notice the difference when you make prints that are really, really large. If all you do is upload pictures to Facebook, no one will notice.
You aren’t establishing focus and depth of field properly
Now we’re getting somewhere. This is one of the more common reasons why a picture might not be as sharp as you’d like.

This is an example of a picture that is not sharp because it’s out of focus.

And this is the same picture taken with proper focus.
This issue is easily fixed by either making sure that your camera’s autofocus is acquiring focus on the correct part of the image. Setting a more specific (and small) autofocus point or zone may require a bit more precision and time on your part, but it will get you better results in the form of properly focused photos.
If part of your image is sharp but the rest of it isn’t (maybe for instance, the closer subjects are sharp, but the distant subjects seem out-of-focus), then you need more depth of field. Depth of field is essentially how much of your image, from near to far, appears to be in focus.

Objects in the front of the frame are out of focus, because we used a shallow Depth of Field.

All objects are in focus because we used deeper Depth of Field, by using a higher aperture.

Try using Single-Point focus for more control.
If more depth of field is what you desire, use a higher f-stop number. This tells the camera to close down the iris more, which results in more depth of field. For all of our landscape shots, we shoot at f/16, or at least f/11, and we generally have all the depth of field of we need, so that everything from a boulder just a few feet away, all the way to the horizon, will be sharp.
Keep in mind that shooting with a high f-stop number results in slower shutter speeds than you are used to, so put your camera on a tripod for greater stability.
Your shutter speed is too slow
… And this brings us to the next reason why your pictures might not be tack sharp. If you’re shooting at high f-stop numbers in low light conditions, chances are good that your camera is not getting enough light to produce a sharp shot when either you are trying to hold your camera by hand, or your subject is moving somewhat quickly (or both).

This is what a photo looks like when your shutter speed is too slow for your moving subject.

If your shutter is fast enough, you can take sharp photos of fast-moving subjects, like a cat.
If everything appears blurry, it means that your shutter speed is too slow to overcome the shaky motions of the camera in your hands. The solution here is to either put your camera on a stable tripod, which eliminates the motion altogether; or to figure out a way to raise your shutter speed while still getting an acceptable exposure. This can be done by raising the ISO, or opening up the aperture to a lower f-number (or both). Generally, a camera that is handheld should be shot at 1/60 of a second or faster, but this rule changes depending on the focal length of your lens, whether or not it has image stabilization, and how steady your hands are. Using image stabilization may allow you to handhold down to 1/15 of a second, or even slower!
Note: If you put your camera on a tripod, make sure to turn image stabilization OFF, or it may actually end up working against you and making your pictures blurry.
If only your moving subject appears blurry, it means you have to find a shutter speed that matches how quickly your subject is moving. An ordinary person doing ordinary things may need a shutter speed that is 1/125 or 1/250 of a second, but sports or wildlife may need a shutter speed that is 1/1000 of a second or even higher.
You’ve cropped too far
My last reason why your picture might not be so sharp is that you’ve decided in post-processing to crop too deeply into the picture to make your subject larger. Cameras these days have a lot more resolution than cameras of a decade ago, but still there are limits to what you can do with cropping. At some point, you will still run out of resolution, when means that there simply aren’t enough pixels in the cropped area to show the details sharply.
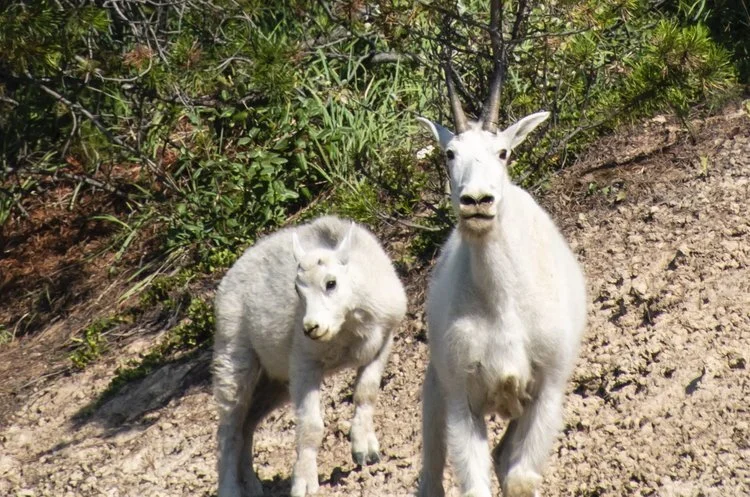
Let’s say we’re starting off with this image, but we want a close-up of just one goat’s face…

… so we use our photo editor to make a really tight crop…

…but unfortunately there aren’t enough pixels in such a small area to produce sufficient detail, so the cropped image appears too soft.
The solution here is not so easy. There are software programs that can help you to overcome some resolution issues by adding extra pixels to make the cropped image appear smoother, but there is no substitute for details that have simply been lost.
If you want to “zoom” into an image to make the main subject look larger, you either need a camera that has more resolution to begin with, so that cropping becomes less of an issue, or you need to physically zoom in on your subject at the time the photo was made by using a more powerful lens, or you need to get closer to your subject.
If you still have issues with photos that just don’t seem sharp enough, don’t hesitate to contact us. We cover the issues of proper focus, depth of field, and shutter speed on all of our workshops and tours.