The beginner photographer’s essentials
As instructors, we're asked nearly every day what camera equipment to buy. This question has different answers, depending on what you're trying to do - are you a beginner? Do you want to take photos of waterfalls? The night sky? Wildlife? Consider this post a guide for the beginning photographer who wants to own more than just what came with the camera, so that you can continue to grow your photography in the direction you want.
If you’re looking at getting a new camera, email us! We can give you specific recommendations. So what should you have in your pack? By far, our most common recommendation is:
A ball-head tripod

This one is the most important. Everyone has an old tripod in the basement somewhere that was once used for camcorders to take home movies. This piece of junk is no good for photography! It is very different from a ball-head tripod, which we suggest you spend at least $120 on for something that will last. The difference is that with a ball-head, you can easily level your camera when you’re working on sloped ground by simply adjusting the ball, whereas with the pan-head you have to tediously adjust the length of the legs one at a time. A good ball-head tripod also allows you to adjust the angle of each leg independently, which is a useful feature for uneven terrain. You can also easily switch to a vertical perspective, which is impossible on a pan-head tripod. You can choose between aluminum or carbon fiber, with carbon fiber being a more expensive option but is also lighter and more robust.
The great news is that there are many more players in the tripod game nowadays than when we started teaching photography. Now, even a carbon fiber tripod costs a fraction of what it used to. We recommend starting out with this affordable Benro Carbon Fiber Tripod. This is a lightweight but full-size tripod that will last through your years of development. We are certain that you will upgrade your camera more times than you upgrade your tripod.
An ultra-wide angle lens

If landscapes and travel are your thing, you will need a proper ultra-wide angle lens to capture landscapes the way you intend. Your kit lens, such as an 18-55 mm, is just not wide enough. You need something that zooms out to at least 11 mm or 12 mm on the widest end to really capture the depth and height of a scene, such as when you want to include tall mountains and a close foreground feature in the same image. If you have a crop-sensor (APS-C) mirrorless camera, try these options for Canon, Nikon, Sony, and Fujifilm. Remember to verify that this works with your specific camera model.
If you’re still new to digital photography, the price of some of these dedicated wide angle lenses may give you a bit of sticker shock! But trust us, it’s better to buy once and cry once, rather than enduring years of frustration over not getting the shots you want.
Shots like the ones below need a quality ultra-wide angle lens.


A remote with a lock
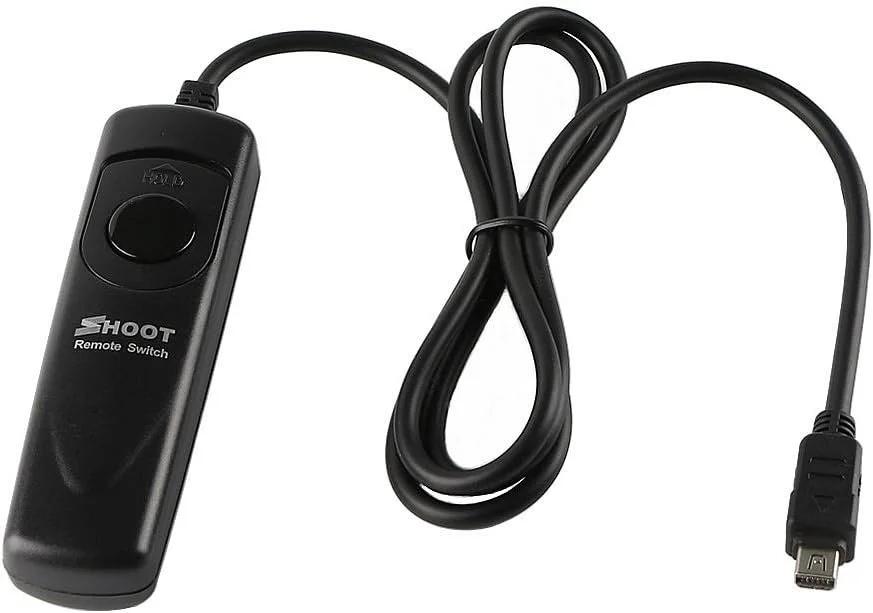
A remote release is an inexpensive tool that will help keep your photos sharp. Once you start dabbling in long exposures, a remote will ensure you aren't shaking the camera when you press the shutter button. A remote with a lock on it will also enable you to use your camera's Bulb Mode function, for taking exposures longer than 30 seconds. This is required for night photography. Most modern mirrorless cameras come with built-in timers and intervalometers, so you can easily set a long shutter speed, or even a series of timed shots, and just walk away while your photo is being made! Importantly, we always recommend you get a cable release rather than a wireless one, because sometimes wireless remotes have trouble staying connected, which might cause you to miss the critical shot!
These are links to shutter release cables for crop-sensor mirrorless cameras made by Canon, Sony, and Fujifilm. For the Nikon crop sensor mirrorless camera, you must use their Bluetooth remote - make sure to check for compatibility with your specific camera.
A UV filter(s)
You should purchase a UV or clear filter for every lens you own. It does not affect picture quality, but is a protective layer over your lens. If you accidentally drop your camera and it hits the ground lens-first, you're much more likely to crack the filter on the front, which might cost you $10-30, versus breaking the front glass element of your lens, which might cost hundreds or even thousands of dollars to repair. It happens.

Make sure you purchase the correct size for each lens, which is the "thread size." The size is generally found on the inner rim of the lens near the glass, the bottom of the lens near the serial number, or on the back of your lens cap. Look for the little circle with the hashmark through it like this one.
A variable neutral density filter

Sunglasses for your camera 😎📷
As you improve your landscape photography, you’ll start to do more long exposures of water to get motion blur effects. But if you've ever tried shooting a long exposure on a bright sunny day, you'll remember that it was impossible to get a long enough shutter speed without overexposing your image. Using a Neutral Density filter is like putting sunglasses over your lens - it reduces the amount of light coming through, enabling you to use a slower shutter speed while producing a proper exposure. This is perfect when you're trying to capture movement, like waterfalls or the ocean. You can buy NDs in different strengths, measured in stops of light, but if you'd like to make it easy on yourself, invest a little more money into a Variable ND filter - a single filter that you can spin to increase the density or strength of the light reduction. Make sure you purchase the right thread size for your lens!
A lens blower
Easily one of the cheapest things we recommend you to keep in your pack at all times. A lens blower is just another tool to keep your equipment clean. Before wiping down any glass, give it a few pumps of air from your lens blower to blow away any coarse dust, so you're not rubbing it into the surface you'll be wiping.
You can get one here.
